Firebase
Firebase (https://firebase.google.com/) is a platform developed by Google that provides a variety of tools and services for building and managing mobile and web applications.
Firebase provides Realtime Database that is NoSQL cloud database. Data is stored as JSON and synchronized in realtime to every connected client.
To use the Firebase Realtime Database with React Native, you can use Firebase JavaScript SDK or React Native Firebase. In this material, we are using the JavaScript SDK (https://firebase.google.com/docs/database/web/start).
Installation
You can install Firebase JavaScript SDK using the following command:
npx expo install firebase
See also step 3: Configure Metro in https://docs.expo.dev/guides/using-firebase/
Shopping List
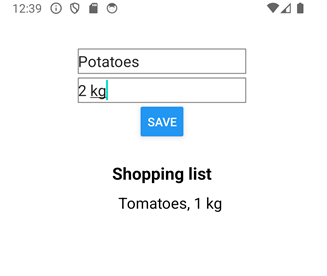
Next, we will implement a simple Shopping list app where users can enter products (title and amount) and save them to the Firebase Realtime Database. Products will be listed using the FlatList component.
Create Expo project
Create a new Expo project and name it shoppinglist. Install Firebase JavaScript SDK.
npx create-expo-app@latest --template blank-typescript
cd shoppinglist
npx expo install firebase
Create Firebase Project
To use Firebase, we have to create a project in Firebase.
-
Sign up to Firebase (https://firebase.google.com/).
-
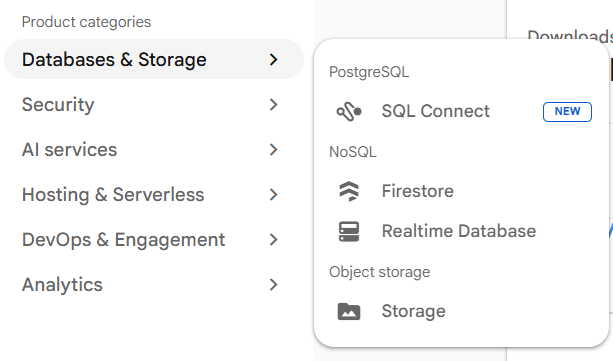
Create a new Firebase project and create new realtime database (Databases & Storages).
In the Security Rules, you can select Start in test mode. You can change security rules later in Realtime Database -> Rules tab.
- Add new App to you Firebase project (Web app)
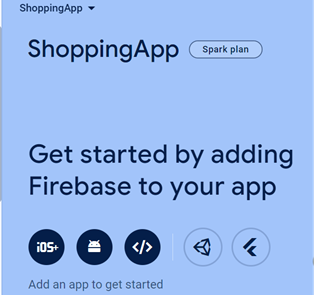
Now, you can get the initialization code in the App registration phase. Copy the initialization code, we will need that later:
// Import the functions you need from the SDKs you need
import { initializeApp } from 'firebase/app';

// Your web app's Firebase configuration
const firebaseConfig = {
  apiKey: "AIzjSyA8Bh7rwerN4OGbVLedJ54hjWj6FHP3fqpegwQ",
  authDomain: "shoppingapp-91ahe.firebaseapp.com",
  databaseURL: "https://shoppingapp-91-rtdb.us-west1.firebasedatabase.app",
  projectId: "shoppingapp-91ede",
  storageBucket: "shoppingapp-91ede.appspot.com",
  messagingSenderId: "1056464134052",
  appId: "1:10864638354052:web:e959565f804cacd0ed691"
};

// Initialize Firebase
const app = initializeApp(firebaseConfig);
Now, we are ready to start app development.
Initialize Firebase
Let's create a new file named firebaseConfig.ts in our Expo project. Copy the initialization code from the previous step. If you haven't copied the code, you can get the initialization code from the Firebase: Project Overview -> Project Settings
Copy the code to the firebaseConfig.js file and export the app:
import { initializeApp } from "firebase/app";

const firebaseConfig = {
  apiKey: "AIzjSyA8Bh7rwerN4OGbVLedJ54hjWj6FHP3fqpegwQ",
  authDomain: "shoppingapp-91ahe.firebaseapp.com",
  databaseURL: "https://shoppingapp-91-rtdb.us-west1.firebasedatabase.app",
  projectId: "shoppingapp-91ede",
  storageBucket: "shoppingapp-91ede.appspot.com",
  messagingSenderId: "1056464134052",
  appId: "1:10864638354052:web:e959565f804cacd0ed691"
};

// Add export keyword here
export const app = initializeApp(firebaseConfig);
The firebaseConfig object contains the configuration settings required to initialize Firebase within the app. The initializeApp function is called with the firebaseConfig object as its parameter. This initializes Firebase within the application using the provided configuration. Finally, the initialized Firebase app instance is exported using export const app. This allows other parts of the application to import and use the initialized Firebase app for accessing Firebase services
Shopping App
Now, we are ready to start develope the shopping list app. We create two states for product and list items that we can show all shopping items in the FlatList component. Open the App.tsx file and define the following type for our products:
type Product = {
  title: string;
  amount: string;
}
Next, create the following states
const [product, setProduct] = useState<Product>({
  title: '',
  amount: ''
});
const [items, setItems] = useState<Product[]>([]);
Next, we add two TextInput components that are used to store entered values in the product state's title and amount properties. We also add the Button component that execute handleSave function when the button is pressed.
const handleSave = () => {
}

return (
  <View style={styles.container}>
    <TextInput
      placeholder='Product title'
      onChangeText={text => setProduct({...product, title: text})}
      value={product.title}/>
    <TextInput
      placeholder='Amount'
      onChangeText={text => setProduct({...product, amount: text})}
      value={product.amount}/>
    <Button onPress={handleSave} title="Save" />
  </View>
);
Next, we implement the save functionality. Import the app instance from the firebaseConfig.
import { app } from './firebaseConfig';
To use realtime database, we have to intialize realtime database and get a reference to service using the getDatabase method. Add the following import and call the getDatabase method:
import { getDatabase } from "firebase/database";

const database = getDatabase(app);
Now, we are ready to use realtime database. The Database reference is needed to perform database operations. The ref method creates a reference to a location in the Firebase realtime database. Data can be saved using the push method. We have to add the following imports in our App component.
import { getDatabase, ref, push } from "firebase/database";
Then we call the push method in our handleSave function. The first argument is a reference to location where data is saved. The second argument is data that is saved (product object). The push method automatically generates unique id for items in the Firebase realtime database.
const handleSave = () => {
  push(ref(database, 'items/'), product);
}
Let's also add check that empty products are not saved:
const handleSave = () => {
  if (product.amount && product.title) {
    push(ref(database, 'items/'), product);
  }
  else {
    Alert.alert('Error', 'Type product and amount first');
  }
}
Now, if you save products, you should see these in your Firebase Realtime Database:
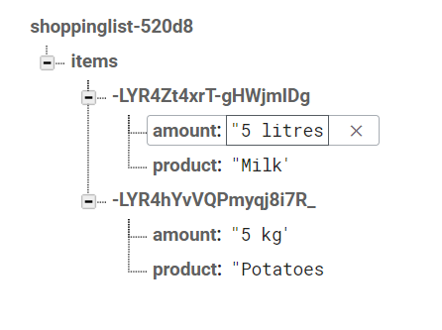
Data can be read by using onValue that listens for data changes in the Firebase realtime database. In our case, it listens for changes to the data at the specified reference (itemsRef). Whenever the data changes, the callback function provided ((snapshot) => { ... }) will be executed.
Inside the callback function, snapshot.val() retrieves the current value of the data at the specified reference. This data is a JavaScript object where the keys are the unique IDs of the items and the values are the shopping item objects. Then, we convert values of the fetched data into an array using Object.values(data) and store that to the items state.
// Import onValue & useEffect
import { useState, useEffect } from 'react';
import { getDatabase, push, ref, onValue } from 'firebase/database';

// Execute onValue inside the useEffect
useEffect(() => {
  return onValue(ref(database, 'items/'), (snapshot) => {
    const data = snapshot.val();
    if (data) {
      setItems(Object.values(data) as Product[]);
    } else {
      setItems([]);
    }
  });
}, []);
onValue returns an unsubscribe function that should be called when the component unmounts, otherwise the listener keeps running and can cause memory leaks or state updates on unmounted components. The useEffect should return it as a cleanup
Finally, we add FlatList component and display products that are saved to the items state.
<FlatList
  renderItem={({item}) =>
    <View>
      <Text style={{fontSize: 18}}>{item.title}, {item.amount}</Text>
    </View>}
  data={items}
/>
Read More
- Firebase Realtime Database documentation: https://firebase.google.com/docs/database
- Firebase Authentication: https://firebase.google.com/docs/auth
- Supabase (Open source alternative to Firebase); https://supabase.com/