Routing
React Router (https://reactrouter.com) is a collection of navigational components for React or React Native applications. There are three different modes to use React Router (Declarative, Data and Framework). In this material, we are using Data mode.
Install React Router using the following npm command:
npm install react-router
React Router example application
In the following example, we create routing for an app with three components Home, About and Contact. The routing is created in the application root in main.tsx

First, you need to create the components that the routing will contain:
// Home.tsx
export default function Home() {
  return(<h3>Welcome to my app</h3>);
}

// About.tsx
export default function About() {
  return(<h3>Discover the features of our application</h3>);
}

// Contact.tsx
export default function Contact() {
  return(<h3>Email: myapp@contact.com</h3>);
}
App component contains the application navigation. The Link component in React Router allows users to navigate to different pages within the app. It renders an <a> HTML element, with its href attribute set to the value specified in the to prop, directing the user to the desired resource. Alternatively, you can use React Router's NavLink component (https://reactrouter.com/en/main/components/nav-link), which provides additional functionality by indicating when a link is active.
Outlet component renders the page navigated to within the App view. It acts as a placeholder where the nested routes will be displayed when their path matches the current URL.
import { Link, Outlet } from 'react-router';

function App() {
  return (
    <>
      <nav>
        <Link to={"/"}>Home</Link>
        <Link to={"/about"}>About</Link>
        <Link to={"/contact"}>Contact</Link>
      </nav>
      <Outlet />
    </>
  );
}

export default App;
First, we will create BrowserRouter in the root of the application (main.tsx) using the createBrowserRouter function. It takes an array of route objects as an argument and it creates a router instance that listens to URL changes and allows your app to manage navigation. It also keeps track of the browsing history.
import App from './App';
import { createBrowserRouter } from 'react-router';

const router = createBrowserRouter([
  {
    path: "/",
    element: <App />,
  },
]);
In the example code, we create the root route that renders our App component when user navigates to the /- endpoint.
const router = createBrowserRouter([
  // root route
  {
    path: "/",
    element: <App />,
  },
]);
The path property is a path pattern. When it matches to current URL, the element will be rendered If a route path pattern ends with /* it will match any characters following the /.
Next, we will create rest of our routes. They are created as children of the root route. One of the children is defined as the index route. It is rendered at the root path /.
const router = createBrowserRouter([  // Import components that are used in routes
  {
    path: "/",
    element: <App />,
    children: [                       // children are nested routes with a route
      {
        element: <Home />,
        index: true                   // index route does not need any path
      },
      {
        path: "about",                // path can be defined relative to the parent path
        element: <About />,
      },
      {
        path: "contact",
        element: <Contact />,
      },
    ]
  }
]);
Finally, we will use RouterProvider component to render the router and pass our routes to this component using the router prop. It acts as the root component that connects the router logic to your React app, enabling it to handle navigation, URL changes, and rendering of the defined components for each route.
import { createBrowserRouter, RouterProvider } from 'react-router';
...

const router = createBrowserRouter([
  {
    path: "/",
    element: <App />,
...

ReactDOM.createRoot(document.getElementById('root')).render(
  <React.StrictMode>
    <RouterProvider router={router} />
  </React.StrictMode>,
);

You can also use declarative mode when defining the router. Then you define your routes directly in your component tree using <Routes> and <Route> components, rather than creating a router object in code.
Read more in https://reactrouter.com/start/declarative/routing
Outlet context
React Router's outlet context is a feature that allows you to pass data from a parent route to its nested child routes using the <Outlet /> component. This is useful in applications with nested routing, where you want to share information (like user data, permissions, or layout state) with deeply nested components without prop-drilling.
How it works:
- In your parent route component, you render
<Outlet context={someValue} />. - In your child route component, you use the
useOutletContext()hook to access the value.
For example, in the previous example, the userName state defined in the App component is passed to all nested routes using the context prop of the <Outlet /> component. This allows any child component rendered by a route to access the userName value directly using the useOutletContext() hook.
import './App.css'
import { Link, Outlet } from 'react-router'
import { useState } from 'react'

function App() {
  const [userName, setUserName] = useState("Lisa Smith");

  return (
    <>
      <nav>
        <Link to={"/"}>Home | </Link>
        <Link to={"/about"}>About | </Link>
        <Link to={"/contact"}>Contact</Link>
      </nav>
      <Outlet context={userName} />
    </>
  )
}

export default App
To access the value passed through the outlet context, use the useOutletContext() hook inside any child component rendered by a nested route. This hook retrieves the context value provided by the parent route's <Outlet />. For example, in the Home component, you can display the userName received from the parent:
import { useOutletContext } from "react-router";


export default function Home() {
  const userName: string = useOutletContext();

  return(
    <>
      <p>Welcome {userName}</p>
    </>
  );
}
Error handling
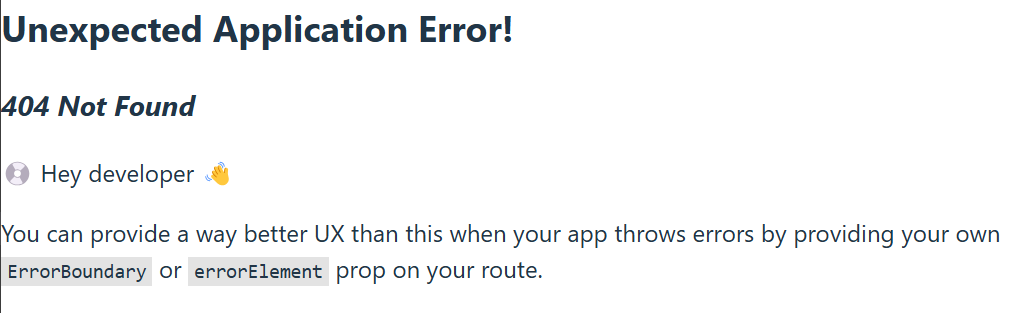
Navigation to a path that does not exist causes an error, and the React Router default error component is rendered:
We can create an own component that will be rendered when error happens. The errorElement prop can be used to define an element that is rendered if router throws an exception. If the errorElement is defined for the root route, it applies everywhere in the router.
const router = createBrowserRouter([
  {
    path: "/",
    element: <App />,
    errorElement: <Error />
  },
  // continue...
Hook useRouteError can be used in an errorElement and it returns the error that was thrown.
// Error.tsx
import { useRouteError } from 'react-router';

export default function Error() {
  const error = useRouteError();
  console.log(error);   // check the console to see the full contents of the error object

  return (
    <>
      <h1>Page not found</h1>
      <p>{error.data}</p>
    </>
  );
}
Further reading
- React Router library: https://reactrouter.com/