React Navigation
React Navigation (https://reactnavigation.org/) is a popular routing and navigation library for React Native applications.
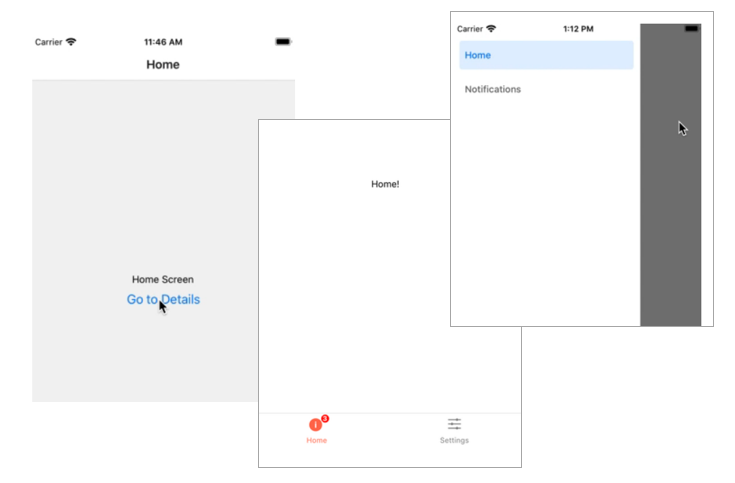
The following navigation patterns are available:
- Stack navigator
- Tab navigator
- Drawer navigator
Installation
Installation of the core library and dependencies (React Navigation v6):
npm install @react-navigation/native
npx expo install react-native-screens react-native-safe-area-context
Tab Navigation
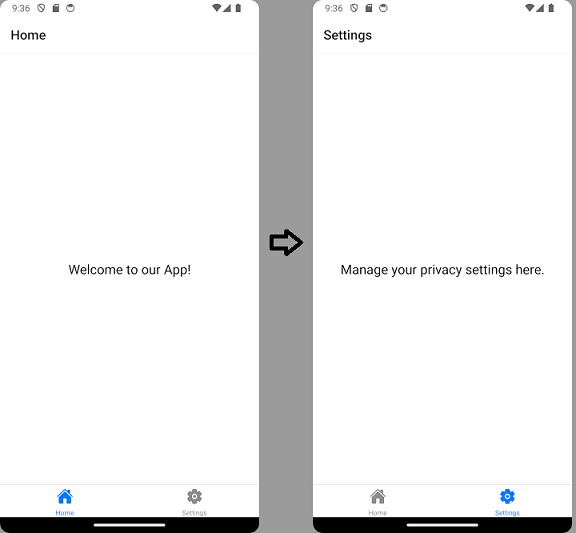
In the next example, we implement a bottom tab navigator that provides navigation between the home and settings screens within the application:
First, create a new React Native app and install React Navigation. Create two components that are used in the navigator:
import { StyleSheet, Text, View } from 'react-native';

export default function HomeScreen() {
  return (
    <View style={styles.container}>
      <Text>Welcome to our App!</Text>
    </View>
  );
}

const styles = StyleSheet.create({
  container: {
    flex: 1,
    backgroundColor: '#fff',
    alignItems: 'center',
    justifyContent: 'center',
  },
});
import { StyleSheet, Text, View } from 'react-native';

export default function SettingScreen() {
  return (
    <View style={styles.container}>
      <Text>Manage your privacy settings here.</Text>
    </View>
  );
}

const styles = StyleSheet.create({
  container: {
    flex: 1,
    fontSize: 20,
    backgroundColor: '#fff',
    alignItems: 'center',
    justifyContent: 'center',
  },
});
To implement tab navigation, we have to install the @react-navigation/bottom-tabs library:
npm install @react-navigation/bottom-tabs
Import the NavigationContainer and createBottomTabNavigator. The NavigatorContainer serves as the root component for the navigation and it must be rendered at the top level of your React Native application.
import { NavigationContainer } from '@react-navigation/native';
import { createBottomTabNavigator } from '@react-navigation/bottom-tabs';

export default function App() {
  return (
    <NavigationContainer>
    </NavigationContainer>
  );
}
Next, we call the createBottomNavigator function that allows you to create a tab-based navigation where tabs are displayed at the bottom of the screen. The function returns an object containing two components: Screen and Navigator.
The Navigator component manages the navigation state and renders the screens based on the current navigation state. The Screen component represents an individual screen within the navigator.
import { NavigationContainer } from '@react-navigation/native';
import { createBottomTabNavigator } from '@react-navigation/bottom-tabs';

const Tab = createBottomTabNavigator();

export default function App() {
  return (
    <NavigationContainer>
    </NavigationContainer>
  );
}
Finally, we can set-up the navigator. The Screen component's name prop defines the name that is used for screen. The name is also used to navigate to the screen. The component prop defines the React component to render for the screnn.
import { NavigationContainer } from '@react-navigation/native';
import { createBottomTabNavigator } from '@react-navigation/bottom-tabs';
import HomeScreen from './HomeScreen'
import SettingScreen from './SettingScreen'

const Tab = createBottomTabNavigator();

export default function App() {
  return (
    <NavigationContainer>
      <Tab.Navigator>
        <Tab.Screen name="Home" component={HomeScreen} />
        <Tab.Screen name="Settings" component={SettingScreen} />
      </Tab.Navigator>
    </NavigationContainer>
  );
}
Now, we should see the bottom tab naviagtor in our app and we are able to navigate between two components.
React Navigation offers two methods for implementing routing: static and dynamic. In this material we use the dynamic (component) method where routing is defined using components. In the static method, routing is defined using objects. For example, the previous example look like this when using static navigation:
import { createBottomTabNavigator } from '@react-navigation/bottom-tabs';
import { createStaticNavigation } from '@react-navigation/native';

const Tabs = createBottomTabNavigator({
  screens: {
    Home: HomeScreen,
    Settings: SettingsScreen,
  },
});

const Navigation = createStaticNavigation(Tabs);

export default function App() {
  return <Navigation />;
}
Tab icons
Expo provides icon library that can be used to show icons in your app (https://docs.expo.dev/guides/icons/).
To use icons, you have to import Ionicons component:
import Ionicons from '@expo/vector-icons/Ionicons';
Then, you can render an icon. The name props defines what icon to display. You can explore different icons in: https://icons.expo.fyi/
<Ionicons name="home" size={32} color="red" />
Next, we'll add icons to our tab navigation bar by utilizing the screenOptions property of the Navigator component.
<NavigationContainer>
  <Tab.Navigator
    screenOptions={({ route }) => ({  // Navigator can be customized using screenOptions
          tabBarIcon: ({ focused, color, size }) => {
            // Function tabBarIcon is given the focused state,
	    // color and size params
            let iconName;

            if (route.name === 'Home') {
              iconName = 'home';
            } else if (route.name === 'Settings') {
              iconName = 'settings';
            }

            return <Ionicons name={iconName} size={size} color={color} />;   //it returns an icon component
          },
        })}>
        <Tab.Screen name="Home" component={HomeScreen} />
        <Tab.Screen name="Settings" component={SettingScreen} />
      </Tab.Navigator>
    </NavigationContainer>
Stack Navigation
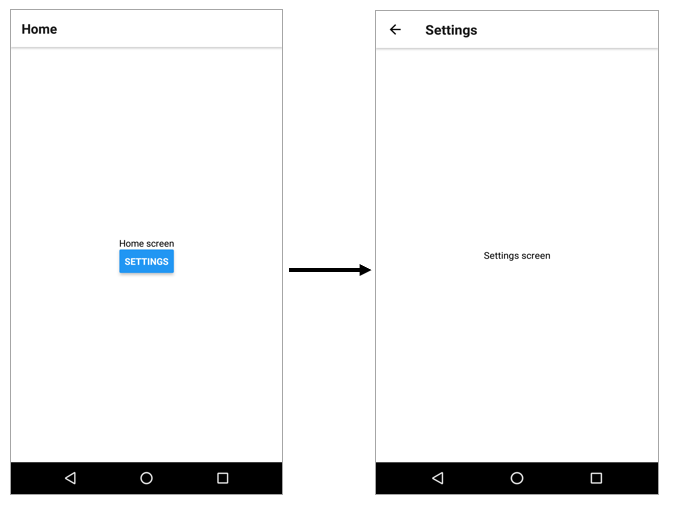
In the following example, we'll demonstrate navigating between two screens using stack navigation.
To use stack navigation, we have to Install @react-navigation/native-stack library:
npm install @react-navigation/native-stack
Import NavigationContainer and createStackNavigator to the App.js file
import { NavigationContainer } from '@react-navigation/native';
import { createNativeStackNavigator } from '@react-navigation/native-stack';
We call the createNativeStackNavigator function and render the navigator and screens. Now, the App.js source code looks like the following:
import { NavigationContainer } from '@react-navigation/native';
import { createNativeStackNavigator } from '@react-navigation/native-stack';
import HomeScreen from './HomeScreen'
import SettingScreen from './SettingScreen'

const Stack = createNativeStackNavigator();

export default function App() {
  return (
    <NavigationContainer>
      <Stack.Navigator>
        <Stack.Screen name="Home" component={HomeScreen} />
        <Stack.Screen name="Settings" component={SettingScreen} />
      </Stack.Navigator>
    </NavigationContainer>
  );
}
We add a button to our HomeScreen component. When the button is pressed, the user is navigated to the settings screen. The component receives a props that includes the navigation object, which contains the navigate function for screen navigation. You can read more about the navigation object at https://reactnavigation.org/docs/navigation-object.
// navigation prop is passed in to every screen component in stack navigator
export default function HomeScreen({ navigation }) {
  return (
    <View style={styles.container}>
      <Text>Home screen</Text>
      <Button
        title="Settings"
        onPress={() => navigation.navigate('Settings')} // Navigate to the Settings screen
      />
    </View>
  );
}
Passing parameters between pages
Parameters can be passed by using the navigator's props that contains route object. You can read more about the route object at https://reactnavigation.org/docs/route-object.
We can add type-check to screen names and params when using React Navigation. You can read about type-checking in https://reactnavigation.org/docs/typescript.
Let's create types.ts file in the /src directory. We declare type that maps each screen name to the parameters it accepts:
export type RootStackParamList = {
  Home: undefined;
  Settings: { userId: string };
};
This gives TypeScript a picture of your navigation structure, so it can catch errors in the development phase. For example, navigating to missing screen or passing the wrong params.
NativeStackScreenProps is a built-in React Navigation type that automatically gives your screen component two typed props: navigation and route.
export type RootStackParamList = {
  Home: undefined;
  Settings: { userId: string };
};

export type RootStackScreenProps<T extends keyof RootStackParamList> =
  NativeStackScreenProps<RootStackParamList, T>;
T is a generic type parameter constrained to be one of the screen name keys. So only 'Home' or 'Settings' are valid values (based on our RootStackParamList). Passing any other string is a compile time error.
Then, we pass RootStackParamList as a generic type argument to createNativeStackNavigator.
import { NavigationContainer } from '@react-navigation/native';
import { createNativeStackNavigator } from '@react-navigation/native-stack';
import HomeScreen from './HomeScreen'
import SettingScreen from './SettingScreen'
import type { RootStackParamList } from '.\types'

const Stack = createNativeStackNavigator<RootStackParamList>();

export default function App() {
  return (
    <NavigationContainer>
      <Stack.Navigator>
        <Stack.Screen name="Home" component={HomeScreen} />
        <Stack.Screen name="Settings" component={SettingScreen} />
      </Stack.Navigator>
    </NavigationContainer>
  );
}
In HomeScreen, we define what type the navigation prop should be by using RootStackScreenProps. The <'Home'> part is a generic type argument and it narrows the type to just the home screen. Then TypeScript can catch mistakes like navigating to a screen that doesn't exist.
import { StyleSheet, Text, View, Button } from 'react-native';
import type { RootStackScreenProps } from './types';

export default function HomeScreen({ navigation }: RootStackScreenProps<'Home'>) {
  return (
    <View style={styles.container}>
      <Text>Home screen</Text>
      <Button
        title="Settings"
        onPress={() => navigation.navigate('Settings', { userId: "johndoe" })} // Navigate to the Settings screen
      />
    </View>
  );
}
In SettingScreen, we define what type the route prop should be by using RootStackScreenProps. Then TypeScript knows exactly what parameters the Settings screen expects (in this case, { userId: string }).
import { StyleSheet, Text, View } from 'react-native';
import type { RootStackScreenProps } from './types';

export default function SettingsScreen({ route }: RootStackScreenProps<'Settings'>) {
  const { userId } = route.params;

  return(
    <View style={styles.container}>
      <Text>Welcome to settings {userId}</Text>
    </View>
  );
}
