Vitest
Vitest (https://vitest.dev/) is a testing framework that can be used easily with vite projects. Vitest provides a Jest like API that is good replacement in the most cases. Vitest also includes the common features required when setting up unit tests (mocking, snapshots, coverage)
Install Vitest using the following npm command. The -D flag is used to install development dependencies. The package is saved in the devDependencies section of the package.json file:
npm install -D vitest
Configuration
Configuration of Vitest is unified with Vite and it is made in the vite.config.ts file's test property. The defineConfig is now imported from vitest/config. It's similar to Vite's defineConfig but specifically for Vitest and it contains test property:
import { defineConfig } from "vitest/config";
import react from "@vitejs/plugin-react";

export default defineConfig({
  plugins: [react()],
  test: {
    // vitest configuration
  },
});
The test is configuration section where you can specify Vitest-specific settings like: test environment, setup files, global test settings.
Running tests
You can run vitest in the project where it is installed using the npx. Or we can add the follwing npm scripts in the package.json file:
{
  "scripts": {
    ...
    "test": "vitest",
    "coverage": "vitest run --coverage"
  }
}
Now, you can run tests using the following npm command:
npm run test
There is also Vitest VSCode extension available that can be used to run test cases.

Testing React components
When testing React components, we need other testing libraries
- React Testing Library helps you to test React components (https://testing-library.com/docs/react-testing-library/intro)
- jest-dom library provides custom matchers that you can use to extend vitest (See all matchers https://github.com/testing-library/jest-dom)
- jsdom provides Browser API
Install the libraries using the following npm command:
npm install -D jsdom @testing-library/react @testing-library/jest-dom
We also have to modify vite test configuration:
import { defineConfig } from "vitest/config";
import react from "@vitejs/plugin-react";

export default defineConfig({
  plugins: [react()],
  test: {
    globals: true,
    environment: "jsdom",
  },
});
globals- Enables Jest globals API (https://jestjs.io/docs/api).environment- Defines the environment that will be used for testing (Node.js is default). We will use browser based environment jsdom.
Creating tests
Now, we will create our first test case using the todo list app that we have developed. Our test cases renders the App component and check that there is "My Todos" text.
Create a new file called App.test.tsx in the src folder and add the first test case.
import App from "./App";
import { test } from "vitest";

test("renders header", () => {});
Import the render method from the React testing library. The render method can be used to render React component for testing.
import App from "./App";
import { test } from "vitest";
import { render } from "@testing-library/react";

test("renders App component", () => {
  // renders the App component for testing
  render(<App />);
});
Next, import the screen method from the React Testing Library. The screen method returns an object that provides queries (i.e. getByText, getByLabelText etc.) that are bound to the whole rendered document.body. These queries can be used to find elements from the HTML document.
In the following example, we use getByText() query to find an element with specified text. The forward slash (/) in /My Todolist/i to define a regular expression pattern, and the i-flag at the end stands for case-insensitive. This means it is looking for rendered content that contains the “Hello World” text in a case-insensitive matter. You can also use a full string match that is case-sensitive by passing a string as an argument to getByText() query.
import App from "./App";
import { test } from "vitest";
import { render, screen } from "@testing-library/react";

test("renders App component", () => {
  render(<App />);
  const header = screen.getByText(/My Todos/i);
});
Then, we check if the header text exists in DOM using the toBeInTheDocument() matcher from the jest-dom library. We have to import @testing-library/jest-dom/vitest to extend Vitest mathcers. Then, you can use jest-dom matchers with Vitest.
The purpose of this test is to ensure that when the App component is rendered, it contains a header with the text "My Todos". If the header is found, the test passes; otherwise, it will fail.
import App from "./App";
import { test, expect } from "vitest";
import { render, screen } from "@testing-library/react";
import '@testing-library/jest-dom/vitest';

test("renders App component", () => {
  render(<App />);
  const header = screen.getByText(/My Todos/i);
  expect(header).toBeInTheDocument();
});
Now, you can run your first test case.
You can change the text in the header and see how failed test case is shown.
Let’s make one example test case for our todo list app that we created in the React Project section. We have stateless TodoTable component that we want to create a test case. Test case ensures that a new todo is displayed in the todo table.
import type { TodoTableProps, Todo } from "./types"

export default function TodoTable(props: TodoTableProps) {
  return (
    <div>
      <table id="todotable">
        <thead>
          <tr>
            <th>Description</th>
            <th>Date</th>
            <th>Priority</th>
          </tr>
        </thead>
        <tbody>
          {props.todos.map((todo: Todo, index: number) => (
            <tr key={index}>
              <td>{todo.description}</td>
              <td>{todo.date}</td>
              <td>{todo.priority}</td>
            </tr>
          ))}
        </tbody>
      </table>
    </div>
  )
}
The following code show test case for the stateless TodoTable component. It adds one todo item to the table and check that it is displayed. We use getByRole() to find the table element and toHaveTextContent() for assertion.
import TodoTable from './TodoTable';
import { test, expect } from "vitest";
import { render, screen } from "@testing-library/react";
import '@testing-library/jest-dom/vitest';
import type { Todo } from './types';

test('renders todotable', () => {
  const row: Todo[] = [
    {description: 'Go to coffee', date: '24.01.2025', priority: 'low'}
  ];

  render(<TodoTable todos={row} />);

  const table = screen.getByRole('table');
  expect(table).toHaveTextContent(/go to coffee/i);
});
You can also test for the opposite of a matcher using the not keyword.
const table = screen.getByRole('table');
expect(table).not.toHaveTextContent(/go to coffee/i);
If you assert element that is not present, it is recommended to use queryBy* methods instead of getBy*. The getBy* queries throws an error if no element is found.
fireEvent
React testing library provides fireEvent method that you can use for firing DOM events, such as button click. For example, to simulate button click:
import { render, screen, fireEvent } from "@testing-library/react";

// Find button element
const button = screen.getByText("My Button");
// Fire click event
fireEvent.click(button);
Let’s create a test where values are added to the description and date input elements and then the Add button is pressed. After that, a new todo item should be added to the table.
The functionality that we want to test is now in the TodoList component; therefore, we will add a new test file Todolist.test.tsx.
import { useState } from 'react';
import type { Todo } from './types';
import TodoTable from './TodoTable';

function TodoList() {
  const [todo, setTodo] = useState<Todo>({description: '', date: '', priority: 'low'});
  const [todos, setTodos] = useState<Todo[]>([]);

  const addTodo = () => {
    if (!todo.description || !todo.duedate) {
      alert('Please fill in all fields');
      return;
    }

    setTodos([todo, ...todos]);
    setTodo({description: '', date: '', priority: 'low'});
  };

  return(
    <>
      <h3>My Todos</h3>
      <input
        placeholder="Description"
        onChange={event => setTodo({...todo, description: event.target.value})}
        value={todo.description}
      />
      <input
        placeholder="Date"
        type="date"
        onChange={event => setTodo({...todo, date: event.target.value})}
        value={todo.date}
      />
      <select
        title="Priority"
        onChange={event => setTodo({...todo, priority: event.target.value as 'low' | 'medium' | 'high'})}
        value={todo.priority}
      >
        <option value="low">Low</option>
        <option value="medium">Medium</option>
        <option value="high">High</option>
      </select>
      <button onClick={addTodo}>Add</button>
      <TodoTable todos={todos} />
     </>
  );

}

export default TodoList;
First, we will add new test case to the TodoList.test.tsx file and we render the TodoList component.
import TodoList from "./TodoList";
import { test } from "vitest";
import { render } from "@testing-library/react";

test("add todo", () => {
  render(<TodoList />);
});
To avoid rendering the component multiple times and encountering issues with finding elements, you should ensure that each test case is isolated. You can use the cleanup function from @testing-library/react to unmount components between tests. The afterEach is a function provided by Vitest. It allows you to run a code after each test case. This is useful for cleaning the state between tests to ensure that each test runs in isolation.
import TodoList from "./TodoList";
import { test, afterEach } from "vitest";
import { render, cleanup } from "@testing-library/react";

afterEach(() => {
  cleanup();
});

test("add todo", () => {
  render(<TodoList />);
});
Next, we can add value to the input elements by using the fireEvent method. Correct input element can be found using getByPlaceholderText query that jest-dom provides.
const desc = screen.getByPlaceholderText("Description");
fireEvent.change(desc, { target: { value: "Go to coffee" } });
const date = screen.getByPlaceholderText("Date");
fireEvent.change(date, { target: { value: "20.11.2025" } });
Finally, we can use fireEvent to click the Add button. Correct button is found using the getByText() query (jest-dom)
const button = screen.getByText("Add");
fireEvent.click(button);
Now, the new todo item should be added to the table and we can use the following statements to assert that.
expect(screen.getByRole("table")).toHaveTextContent(/go to coffee/i);
Below is the whole TodoList.test.tsx code:
import TodoList from "./TodoList";
import { test, afterEach, expect } from "vitest";
import { render, screen, cleanup, fireEvent } from "@testing-library/react";
import '@testing-library/jest-dom/vitest';

test("add todo", () => {
  render(<TodoList />);

  const desc = screen.getByPlaceholderText("Description");
  fireEvent.change(desc, { target: { value: "Go to coffee" } });
  const date = screen.getByPlaceholderText("Date");
  fireEvent.change(date, { target: { value: "20.11.2025" } });

  const button = screen.getByText("Add");
  fireEvent.click(button);

  expect(screen.getByRole("table")).toHaveTextContent(/go to coffee/i);
});

afterEach(() => {
  cleanup();
});
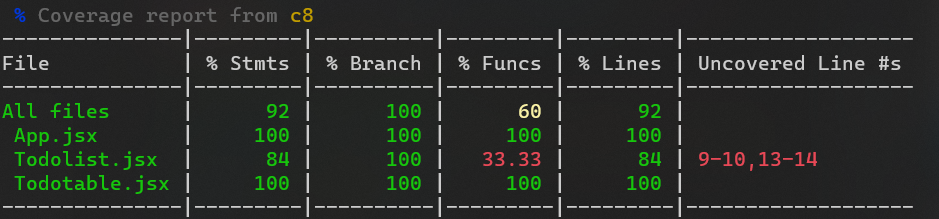
Coverage testing
"In computer science, code coverage is a percentage measure of the degree to which the source code of a program is executed when a particular test suite is run" - Wikipedia
You can run coverage test using the command:
npm run coverage
Vitest is using v8 (https://v8.dev/) to support coverage testing. When you start the coverage test, it will prompt you to install the v8 package automatically.